Streaming via Teradek Encoder
We support the Teradek Cube and Bond encoders both as direct connections to SetStream as well as via Core.
Once you’re logged into the Cube’s web interface, navigate to the Video/Audio Input settings. The below image will show you a typical input configuration.
The main thing to note here is your Audio input. If your sound mixer is directly feeding the Cube with the external input, select “Analog”. If the sound will be via the SDI/HDMI input, select ‘Embedded”.

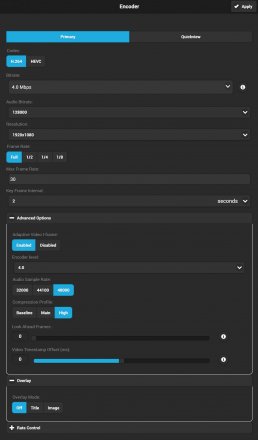
Now navigate to the Encoder settings. We’ll select H.264 for our codec. HEVC is an option for streaming to SetStream via Core, but latency is added. 2-4 Mbps is a good target to aim for quality video without too much bandwidth requirements. Refer to our bitrate recommendations article for an in depth look at bitrate options.
Under the advanced options, we can use Encoder level 4.0 and under most circumstances the compression profile can be set to High. Most browsers support High profile with SetStream.
Look Ahead Frames allows you to delay the image a certain number of frames in order to increase image quality. For lowest latency, set this to ‘0’.
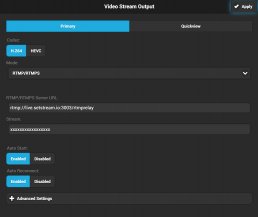
Now, let’s go to the ‘Video Stream Output’ settings. Select RTMP/RTMPS. In the ‘RTMP/RTMPS Server URL’ entry, paste the URL that is associated with your project under the ‘Stream Keys’ tab . Then copy the Stream Key listed in ‘Stream Keys’ tab and paste it in the ‘Stream’ entry of your Cube/Bond. This is the stream key that is paired with your project and is how your Cube will communicate with our servers. Personally I like ‘Auto Start’ and ‘Auto Reconnect’ because then anytime you loose power or connection, or video signal, the stream will start back up as soon as you are powered up and connected. You can always pause the stream by pressing the red button twice.
This covers the basics of how to setup your Teradek Cube for streaming. You’ll also want to configure your Cube’s network settings to work optimally with your network.