Streaming via ATEM Mini Pro
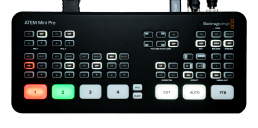
The ATEM Mini Pro by Blackmagic Design is a powerful, affordable device. Along with its switching and keying abilities its a dedicated hardware RTMP encoder that can broadcast directly to SetStream without a computer attached. It’s one of the lower latency RTMP encoders available.
Because it’s so feature-rich the ATEM Mini Pro has a lot of options. For our purposes I’ll focus only on setting up the streaming functionality. Let’s dive in.
First, go to Blackmagic’s support page and download the latest version of the ATEM software. In order to setup the ATEM we’ll have to connect it to a computer with a user-provided USB cable. Once connected, open up ‘ATEM Software Control’. After a few seconds your ATEM Mini should appear.
The first thing you’ll need to do is set your base frame rate. The ATEM is capable of converting to and from most standard frame rates automatically. However if you have a mismatched base frame rate from your source the image might have unfavorable characteristics. You’ll want to set your frame rate to the same rate as your source. If you’re shooting 50 or 59.94fps you’ll want to select 25 or 29.97 in order to retain higher image quality for the stream.
To set your base frame rate, select the gear icon in the lower left corner of the software. You can select your preferred rate from the dropdown.
Next, configure the network settings because you’ll be using the ethernet port on the ATEM to connect your video feed to SetStream.
Now, let’s take a look at the ‘Live Stream’ panel on the ‘Output’ tab.
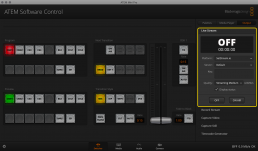
Right away you’ll notice under the ‘Platform’ dropdown your only options are Youtube, Facebook, and Twitch. We need to add SetStream.io URL and settings to the ‘Streaming.xml’ file in the application’s folder. Instead of modifying the file by hand I’ve included a pre-modified ‘Streaming.xml’ file here for you to download.
Once you’ve downloaded the file navigate to the following directory and replace the existing Streaming.xml file. I recommend renaming the old file and saving it.
MacOS: /Library/Application Support/Blackmagic Design/Switchers/Streaming.xml
Windows: C:\Program Files (x86)\Blackmagic Design\Blackmagic ATEM Switchers\ATEM Software Control\Streaming.xml
Close and restart ‘ATEM Software Control‘. SetStream.io should now appear as an option. If you’d like you can modify the XML file to customize your bitrate options.
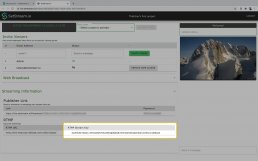
Now input the project-specific Stream Key, which is found on your SetStream ‘Project Page’. Make sure to copy the entire string of text. Once you’ve setup the XML file for SetStream, you won’t need to modify it from project to project.
Select a bitrate that’s appropriate for your uplink and viewer network connections.
Once your ATEM Mini Pro is configured to your liking you can disconnect the USB port. If your ethernet port has a connection, press the ‘ON AIR’ button on the device panel. If it turns solid red, you have a connection to SetStream and are streaming. Just add viewers! You should see the stream in the witness monitor on the upper-right area of the Project Page. If the ‘ON AIR’ button persistently blinks red, then the ATEM failed to make a connection. Check that your network is correctly configured and you have a solid internet connection going to the ATEM. Also check that your Stream Key is an exact match to the full string of characters from your SetStream Project Page. If you’ve hand-modified the XML, double check that the URL is correct and you’ve not made any typing errors.
One final thing to note about the ATEM Mini Pro is that when your computer is connected via USB, the ATEM is recognized as a web-cam. Technically it can be used as a source for our Web Broadcast module. Unfortunately the ATEM mini and mini Pro weren’t designed to common webcam standards and highlights and shadows are crushed and loose detail. Therefore we don’t recommend using the ATEM with our Web Broadcast module. We’ve addressed this with Blackmagic and are hoping to see a firmware update that fixes this.