Multicam Support

Covid-19’s second wave is sweeping the world and we at SetStream recognize this isn’t going away soon. We are committed to improving and adding features, enabling you to continue to safely create and work in this time of crisis.
Multicam Support: You asked for it, now it’s here!
- Stream from multiple locations. Stream up to 4 cameras whether they’re in a single location, or spread around the world.
- Web Broadcast, OBS Studio, RTMP Support. Mix and match camera sources from all the different streaming methods that we offer.
Great for Post Production Too
SetStream.io’s Multicam feature isn’t just for production. Use it in post too. Stream your hero video feed alongside a screen share of your desktop interface so your clients can see your timelines and precise adjustments.
4K All Day!
If you’re fortunate enough to have a robust high bandwidth connection to your clients, you can stream high bitrate 4K video using Assimilate Scratch or OBS Studio. SetStream.io is resolution-agnostic when streaming from these sources. So clients can see their content in full resolution.
Subscription pricing coming soon
We’re working hard to bring monthly subscriptions to our users. Contact support for details.
Follow us for regular updates and information
If you haven’t yet, follow us on Facebook and Instagram to get more frequent updates and insights to what we’re up to at SetStream.io. Also check out our new Getting Started section for details whether your a technician, or a producer it’ll walk you through the SetStream workflow: https://setstream.io/getting-started
Mask up and Stay safe!
11/4 Update
Hello again from SetStream.io. We want to share with you some of the updates and new features we’ve been working on!
We Love Post!
- Post Passes. We now have 1, 3, 5 hour passes to fit the needs of post production. activate multiple passes at once, or incrementally to create a session that fits your exact needs. This is perfect for review sessions.
- Realtime OBS Streaming. Thanks to CoSMo Software for their hard work developing a WebRTC version of OBS Studio. This provides 200ms realtime streaming at any bitrate through SetStream. Check out our tutorial on how to get started streaming in realtime via OBS.
Incremental Improvements
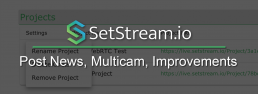
- Project Management, including project renaming/removal, clear chat history
- Directly access projects from your Account Dashboard without needing project-specific password.
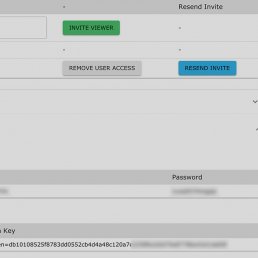
- Teradek compatibility. RTMP Stream Keys are now available directly on the project page without having to contact support.
- Viewer Pricing Flexibility. We’ve created more flexibility around viewer access by adding 20 viewer and 45 viewer passes. We’ve also added a 10 viewer add-on pass for when you unexpectedly need to add viewers.
Multicam coming soon!
We’re excited to announce that Multicam support is on it’s way! Soon you’ll be able to stream multiple cameras, including production and on-set witness cams. Stream up to 4 cameras, from one or multiple locations spread around the world
Get to know SetStream.io
If you haven’t used SetStream yet, check out our Getting Started section to find out how it works, and what you need to get started. Then sign up for a free trial to see how SetStream.io fits in your workflow.
Please contact us with any questions and we’ll be in touch again when we have more exciting news and updates.
Getting Started
Getting Started
What is SetStream.io?
SetStream.io is a cloud based remote collaboration service for film and television professionals. We are the link between your on-set or post production hardware and the screens of your remote viewers.
SetStream.io is designed specifically for the needs of the film industry, featuring realtime secure streaming with browser-based and iOS viewers that doesn’t require downloads, plugins, or account creation.
How do I pay for SetStream?
We offer annual and monthly subscriptions as well as short term daily and hourly passes. Subscriptions can be attached to any Project on your account, and moved between projects.
Passes are stored on your account until you are ready to use them, and can be activated on a single project at any time. Viewer counts and duration can be update anytime through the Project page.
Passes can be used in addition to Subscriptions for more flexible viewer counts.
We offer 1 hour free trials that can be used once a day. NO CREDIT IS NEEDED to create an account with a free trial pass. Simply checkout with a free trial to create your account and start collaborating.
How do my clients view the stream?
Viewing the stream is very simple. Emails can be sent directly to your viewers through the Project page viewers tab. Alternatively a Link + Code or an embedded link can be copied and shared by any other means. In a web browser or our iOS app your viewers will use the link and code provided by you or in the email to log in to your project. Viewers do not need to create accounts to collaborate with you.
Getting Started Overview
What do I need to start streaming?
To start streaming, you’ll need a video and/or audio source, and either a capture device or encoding hardware. Here are some of the available options. View our tutorials and compatibility article for more details.
View our tutorials and compatibility article for more details.
OBS Studio (Recommended)
Best control, widest capture device selection. More detailed setup required.
*We recommend Apple M1 / M2 devices
Web Browser (Simplest Setup)
Ideal for quick simple setup, screen sharing, multiple streams.
- Magewell USB Capture SDI Plus
- AJA U-TAP
- Any UVC (Webcam) capture device
*We recommend Apple M1 / M2 devices with Google Chrome
Hardware Encoder (Great for on set)
Ideal for mobility, battery powered, run and gun, and when using a computer is inconvenient.
*Performance and latency over RTMP may not be as good
Screen Sharing
Want to share your timeline so your viewers can see the changes you are making in real time? Screen Share your session on the B Camera feed so you viewers can watch the high quality picture (A Camera) along side your timeline changes to follow your changes. SetStream.io supports up to 4 high quality video feeds simultaneously.
Screen Sharing Tutorial
Streaming via OBS Studio
Streaming via OBS Studio (WebRTC)
SetStream supports streaming via OBS Studio using a custom WebRTC version. Download link found below.
OBS WebRTC allows for maximum flexibility, and is the best way to stream high quality, high resolution, low latency, color accurate video. OBS is a powerful tool with many options and settings for custom workflows. But we are going to focus on the basics to get you streaming, with a focus on color accuracy.
Note – There is a bug in versions after 1.3.2 (27.2.4) through 1.5.0 (28.1.2) that affects color rendering. The bug was fixed in V 1.5.1 (thank you CoSMoSoftware). Please use either V. 1.3.2, or V 1.5.1 or newer to ensure color accuracy.
First we’ll install OBS, and open it. Once open, we’ll add a source. For our example we’ll add a ‘Blackmagic Device’ from the source list. However you can also add other devices by choosing ‘Video Capture Device’ as your source.
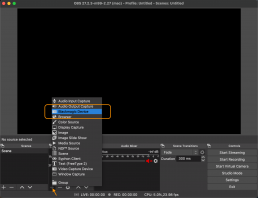
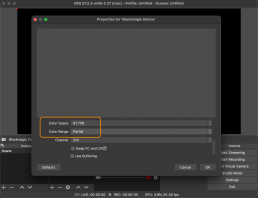
Click ‘OK’ and you’ll be taken to the source properties where you can select your specific Blackmagic device.
scroll down until you see ‘Color Space’ and ‘Color Range’. Sometimes the ‘Default’ setting will make a mistake, so I recommend you select ‘Rec709’ and ‘Partial’, assuming your video source is a standard Rec709 legal signal.
Then Click ‘OK’.
This next step is optional. Most browsers and devices display video in sRGB-2.2 color space. If you’re a colorist that grades in Rec709-2.4, we’ll need to apply this conversion LUT that causes browsers/devices to correctly display your image in Rec709-2.4. Here is a link to download the conversion LUT. OBS uses PNG image files as LUTs. Don’t be confused.
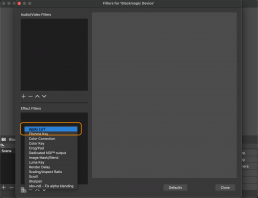
To apply a LUT, we’ll add a filter to the source. Select your Blackmagic Device in the source list and click ‘Filters’.
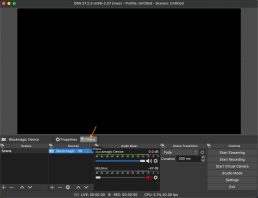
Now add an ‘Effects Filter’ and ‘Apply LUT’ and click ‘OK’. Then click ‘Browse’ and select the PNG LUT file you downloaded. Then click ‘Close’.
Now that our source is setup, we’ll go to the OBS settings.
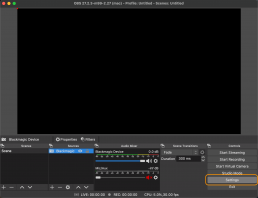
We’ll focus on the Stream, Output, Video, and Advanced tabs.
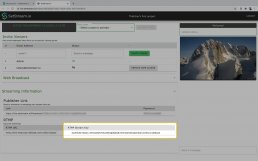
First, let’s go to our SetStream project page, ‘Keys’ tab and copy our Stream Name and Publishing Token.
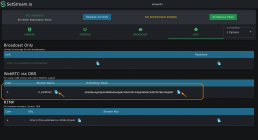
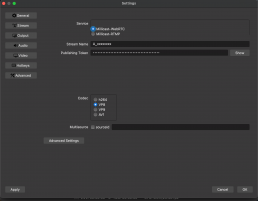
Now, back in OBS, let’s go to the ‘Stream’ tab in the settings. Here you can paste your Stream Name and Publishing Token.
You’ll also select your Codec. All of these codecs have advantages and disadvantages, but to keep this short, we highly recommend VP8. VP8 is the best compatibility/color accuracy combination.
Let’s move on to the Output tab. Here we only need to focus on Video/Audio bitrate. This version of OBS bypasses many of the encoding options. The bitrate you set is a limit. The actual bitrate will fluctuate based on the video content and your connection speed. For color and post production, we recommend starting at 10000. The bitrate may settle in around 5000. You can set it to 20000 for critical work. For on-set work we typically recommend below 5000 due to the limitation of both the streaming internet as well as internet limits for client devices.
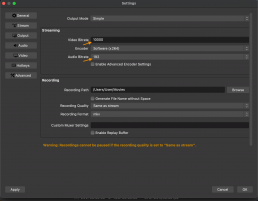
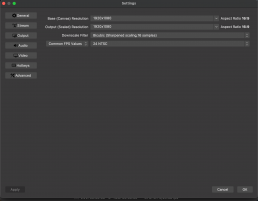
On the Video Tab you can set your canvas and output resolutions. Typically I match these both to 1920×1080.
You can also set the frame rate. Again, match this to the frame rate of your video content. A quick note that ’24 NTSC’ is equivalent to 23.976.
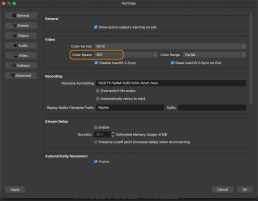
Lastly we’ll make one adjustment to the Advanced tab.
Because most of our streaming codecs are interpreted by browsers and devices as Rec601 colorspace (then converted to sRGB), we have to set OBS to Rec601. This will cleanly convert our Rec709 image into a Rec601 package, which will then get re-decoded correctly by the browser. So in this tab, simply select Rec601 for your colorspace. Everything else can be left alone.
All you need to do now is press ‘Start Streaming’.
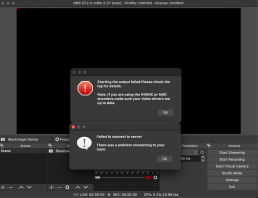
Troubleshooting
There are a couple errors whose dialogue can be confusing. If you get either of the two following error messages, the most likely problem are the following:
- There is a misspelling in your Stream Key or Publishing Token.
- Your project doesn’t have a pass currently activated.
Color Accuracy Notes
Our above recommendations are based on in-depth testing and analysis using both image pipeline capture, and spectrophotometer color patch sampling, all confirmed by trained eye.
We also highly recommend recent Mac laptops, iPhones, and iPads as color accurate viewing devices. Apple has done a spectacular job with consistency in their screens.
Our recommendations and tests were based on using recent OBS Studio WebRTC (27.2.3-m99-2.27) for streaming, and MacOS 12.4, Safari 15.5, Chrome 102.0.5005.61, and iOS 15.5 for viewing. Using older software may affect the results. Please be sure that you’re using the latest OBS WebRTC, and your clients are using the latest software on their devices.
If you want to dive deeper into the color accuracy, see our updated Color Accuracy article here.
8/3 Update
Web Broadcast Quality Improvements
Broadcasting from the web browser on SetStream has always been easy. From fully-encrypted transmission, to ultra low-latency, to simplicity and ease of use, our built-in Web Broadcast module brings a lot to the table. That is why we have been working hard to improve upon its quality and reliability. I’m writing today to let you know about some big steps we’ve taken to improve our service. Those improvements include:
- Overall image quality enhancements
- Fast connection negotiation when stream starts
- Support for Blackmagic UltraStudio, Decklink, and Mini Recorder
- Additional security, stability, and layout improvements
For the best experience we recommend using the Chrome web browser.
New Features to Come
Thank you to everyone who has given feedback and feature requests. We hear you loud and clear and are excited to implement some very exciting new features soon. This is just a tease. We’ll have more details soon!
We've Gone Global!
We are now officially world-wide. We quietly opened sales in South America, Asia, Australia, and Africa last week. Today we open the EU. You can now use SetStream no matter where in the world you are.
We’ve been vigorously adding content to our Kowledge Base. If you haven’t been there recently, check out the new tutorials and our revised Device Compatibility article.
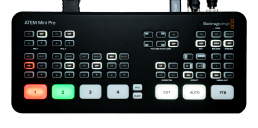
Streaming via ATEM Mini Pro
Streaming via ATEM Mini Pro
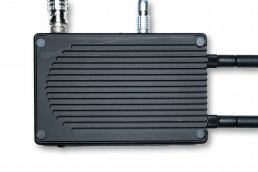
The ATEM Mini Pro by Blackmagic Design is a powerful, affordable device. Along with its switching and keying abilities its a dedicated hardware RTMP encoder that can broadcast directly to SetStream without a computer attached. It’s one of the lower latency RTMP encoders available.
Because it’s so feature-rich the ATEM Mini Pro has a lot of options. For our purposes I’ll focus only on setting up the streaming functionality. Let’s dive in.
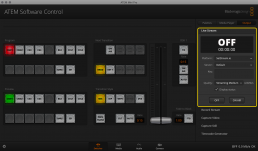
First, go to Blackmagic’s support page and download the latest version of the ATEM software. In order to setup the ATEM we’ll have to connect it to a computer with a user-provided USB cable. Once connected, open up ‘ATEM Software Control’. After a few seconds your ATEM Mini should appear.
The first thing you’ll need to do is set your base frame rate. The ATEM is capable of converting to and from most standard frame rates automatically. However if you have a mismatched base frame rate from your source the image might have unfavorable characteristics. You’ll want to set your frame rate to the same rate as your source. If you’re shooting 50 or 59.94fps you’ll want to select 25 or 29.97 in order to retain higher image quality for the stream.
To set your base frame rate, select the gear icon in the lower left corner of the software. You can select your preferred rate from the dropdown.
Next, configure the network settings because you’ll be using the ethernet port on the ATEM to connect your video feed to SetStream.
Now, let’s take a look at the ‘Live Stream’ panel on the ‘Output’ tab.
Right away you’ll notice under the ‘Platform’ dropdown your only options are Youtube, Facebook, and Twitch. We need to add SetStream.io URL and settings to the ‘Streaming.xml’ file in the application’s folder. Instead of modifying the file by hand I’ve included a pre-modified ‘Streaming.xml’ file here for you to download.
Once you’ve downloaded the file navigate to the following directory and replace the existing Streaming.xml file. I recommend renaming the old file and saving it.
MacOS: /Library/Application Support/Blackmagic Design/Switchers/Streaming.xml
Windows: C:\Program Files (x86)\Blackmagic Design\Blackmagic ATEM Switchers\ATEM Software Control\Streaming.xml
Close and restart ‘ATEM Software Control‘. SetStream.io should now appear as an option. If you’d like you can modify the XML file to customize your bitrate options.
Now input the project-specific Stream Key, which is found on your SetStream ‘Project Page’. Make sure to copy the entire string of text. Once you’ve setup the XML file for SetStream, you won’t need to modify it from project to project.
Select a bitrate that’s appropriate for your uplink and viewer network connections.
Once your ATEM Mini Pro is configured to your liking you can disconnect the USB port. If your ethernet port has a connection, press the ‘ON AIR’ button on the device panel. If it turns solid red, you have a connection to SetStream and are streaming. Just add viewers! You should see the stream in the witness monitor on the upper-right area of the Project Page. If the ‘ON AIR’ button persistently blinks red, then the ATEM failed to make a connection. Check that your network is correctly configured and you have a solid internet connection going to the ATEM. Also check that your Stream Key is an exact match to the full string of characters from your SetStream Project Page. If you’ve hand-modified the XML, double check that the URL is correct and you’ve not made any typing errors.
One final thing to note about the ATEM Mini Pro is that when your computer is connected via USB, the ATEM is recognized as a web-cam. Technically it can be used as a source for our Web Broadcast module. Unfortunately the ATEM mini and mini Pro weren’t designed to common webcam standards and highlights and shadows are crushed and loose detail. Therefore we don’t recommend using the ATEM with our Web Broadcast module. We’ve addressed this with Blackmagic and are hoping to see a firmware update that fixes this.
WebRTC or RTMP
WebRTC or RTMP
SetStream.io is a WebRTC-based infrastructure. We distribute globally to our viewer portal via WebRTC which is a fast and reliable way to deliver to viewers. This delivery system is what makes SetStream so successful at delivering high quality content in low latency, whether you use WebRTC or RTMP for the camera uplink. This article discusses the camera uplink methods that we offer, each of which provides specific benefits for your workflow. Lets dive into the implications of these different protocols.
WebRTC Web Broadcaster camera uplink
WebRTC is a Real Time Communication protocol that is implemented directly in your web browser. You don’t need any plugins or special apps. To send a camera signal to SetStream with the Web Broadcaster, all you need is a capture device and a supported browser. It’s the simplest way to get going, and there are very few settings you need to worry about. It’s also going to be your lowest latency option (200-500ms). If simplicity and realtime broadcast is important to you, this should be your go-to choice. Check out our Streaming via Web Browser article for more details.
RTMP Based camera uplink
Traditional implementations of RTMP can have several seconds of delay, or even minutes. Therefore RTMP gets a bad rap. But RTMP doesn’t inherently mean multi-second latency when implemented certain ways. With a WebRTC-based delivery system, we are able to reduce the latency of the RTMP uplink down to approximately 1/2 – 2 seconds. With such low latency, RTMP becomes an attractive option.
Our RTMP uplink option gives you as much customizability of the stream as your encoder allows, enabling you to get an extremely high quality image. This should be your option if image quality is most important. RTMP works with both software and hardware encoders, giving you all the flexibility you need in different shooting scenarios.
Network Connection
Network Connection
Piping an image signal through the internet generally requires good network infrastructure, both for the encoder as well as for the viewers. We’ll go over some general guidelines and best practices that will get you the best signal possible.
Know before you go!
The most important thing to enable a good quality stream is to know what your internet situation will be like before the shoot. Here are some tips on how to prepare ahead of time.
- Connect with your location representative to find out what the internet situation is. You may need to speak to someone in the IT department.
- Consider giving your tech a prep/scout day. They can research the options, test connections, and do a dry run stream to clients.
- Determine your method of connection. Physical connection, wireless LAN, Cellular
- Determine connection quality. Use tools like Speedtest.net to understand the bandwidth and stability of the internet at each location.
- Have a chat with your remote viewers and make sure they're getting the best connection possible and have them do a speedtest as well.
- All this will help you determine what bitrates you'll be able to stream at.
Physical connection (Ethernet)
Having a physical connection to the internet is the gold standard in streaming connectivity. It should always be your first choice whenever your shooting conditions allow for it. You’ll avoid all the headaches involved in wireless methods of connecting.
Pros
- Reliability
- High bandwidth
Cons
- Requires a cable to run to laptop/encoder
- Can be difficult to track down a working port.
When we talk about a physical connection, what we mean is an ethernet cable connecting your internet source (router, switch) to the encoder or laptop. Most modern laptops need a USB or Thunderbolt adapter to make the connection. You’ll also need a cable. CAT-5e or better cables are readily available on Amazon. I recommend a long cable, maybe 200+ feet just in case your connection point isn’t near set.
Wireless LAN (Wifi)
If a physical connection isn’t possible or practical for your shoot, your next option to consider is a wireless LAN.
Pros
- Semi-Reliable
- No cables to plug in
Cons
- Interference or weak signal
- Login/Authentication can be tricky
If your location has a wifi network and you’re using a laptop to stream, it shouldn’t be difficult to connect to using any type of login/authentication the network requires. However if you’re using a hardware encoder, you’re for the most part limited to standard username/password login. If the network has a web-browser based authentication, you might be out of luck.
Another problem you might have with wifi is interference on set. It’s very common for there to be competing signals with all the other wireless technologies that are transmitting. Wireless DMX lighting systems are often one of the biggest causes of interference. Some wireless DMX technologies signal scan, transmitting effectively on almost every channel, thus making it difficult for Wifi devices to make a connection.
Hybrid Option
You may be in the scenario where the location Wifi isn’t available, but there is a physical connection, And it’s either too far from your shooting location, or you aren’t able to run a cable direct to the encoder. In this case it might make sense to use a wireless access point (usually a router can be setup as an access point). In this case, you would connect the access point to the physical connection. Then connect the encoder/laptop wirelessly to your access point.
Cellular Connection (4G LTE)
This is probably a last resort, but might be the perfect solution for your production. It isn’t cheap, but in some circumstances, it can provide optimal flexibility.
Pros
- An option when location can't provide internet
- Untethered from physical cables
- Less interference with on-set wireless signals
Cons
- Can be pricy
- Requires special equipment and knowhow
- Network quality can change sporadically
This option will cost you the most. On top of the cost of your encoder, you’ll need a cellular modem (ideally a USB or Ethernet based device, not a wifi hotspot), and you’ll need to pay for LTE data usage. This is a minimum requirement. Often times you’ll need a bonded cellular interface to enable a more stable connection through multiple modems. This will bump your cost even more requiring a special encoder or router, multiple cellular modems, and a paid service in the cloud that connects the multiple data streams. If you have to go this route, you could have a lot of flexibility in streaming from anywhere that has reasonable cellular reception. Just ensure you have a tech that can operate the system and can scout all the locations for signal strength.
Streaming via Teradek Encoder
Streaming via Teradek Encoder
We support the Teradek Cube and Bond encoders both as direct connections to SetStream as well as via Core.
Once you’re logged into the Cube’s web interface, navigate to the Video/Audio Input settings. The below image will show you a typical input configuration.
The main thing to note here is your Audio input. If your sound mixer is directly feeding the Cube with the external input, select “Analog”. If the sound will be via the SDI/HDMI input, select ‘Embedded”.

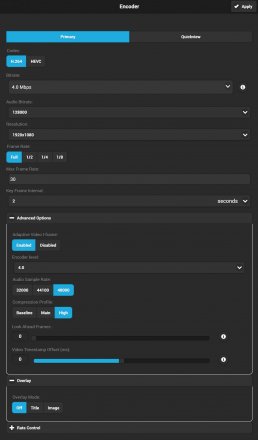
Now navigate to the Encoder settings. We’ll select H.264 for our codec. HEVC is an option for streaming to SetStream via Core, but latency is added. 2-4 Mbps is a good target to aim for quality video without too much bandwidth requirements. Refer to our bitrate recommendations article for an in depth look at bitrate options.
Under the advanced options, we can use Encoder level 4.0 and under most circumstances the compression profile can be set to High. Most browsers support High profile with SetStream.
Look Ahead Frames allows you to delay the image a certain number of frames in order to increase image quality. For lowest latency, set this to ‘0’.
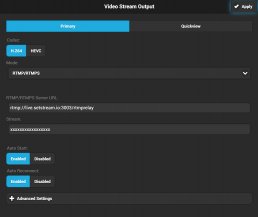
Now, let’s go to the ‘Video Stream Output’ settings. Select RTMP/RTMPS. In the ‘RTMP/RTMPS Server URL’ entry, paste the URL that is associated with your project under the ‘Stream Keys’ tab . Then copy the Stream Key listed in ‘Stream Keys’ tab and paste it in the ‘Stream’ entry of your Cube/Bond. This is the stream key that is paired with your project and is how your Cube will communicate with our servers. Personally I like ‘Auto Start’ and ‘Auto Reconnect’ because then anytime you loose power or connection, or video signal, the stream will start back up as soon as you are powered up and connected. You can always pause the stream by pressing the red button twice.
This covers the basics of how to setup your Teradek Cube for streaming. You’ll also want to configure your Cube’s network settings to work optimally with your network.
Streaming via Web Browser
Streaming via the Web Browser
Our built-in Web Broadcast Module provides key benefits over other streaming methods. It’s WebRTC-based infrastructure is the lowest latency streaming method at only 200-500ms. It’s our most secure uplink option. And it’s the simplest way to setup a stream. All you need to get started is a laptop, an internet connection, and an input source such as a Blackmagic UltraStudio Mini Recorder (Thunderbolt 2 version).
To get started, download Desktop Video 11.5 from Blackmagic’s support page, plug your Mini Recorder into the computer’s thunderbolt port, and attach your SDI or HDMI source to the device.
Before reading further make sure you’ve watched our Interface Overview slideshow and familiarized yourself with the interface.
We support Chrome for Web Broadcast. It will provide the best quality and reliability. Proceed to the Project Page. When the page loads, You’ll see a prompt asking you to allow the use of your camera and microphone. Select “Allow”.
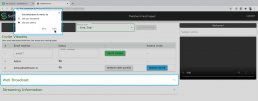
Now navigate to the Web Broadcast Module and click to expand.
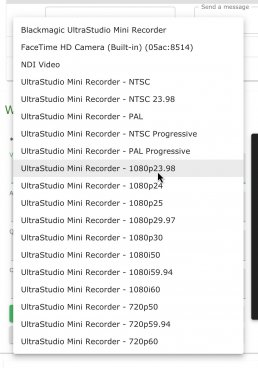
From here you’ll select a video and audio source. In this case, we’ll select the Mini Recorder for both the video and audio sources. You’ll need to select your source’s matching framerate/resolution format in the dropdown. The video source won’t immediately appear in the viewer. It’ll only appear once you start streaming.
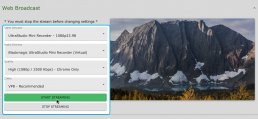
The browser is designed to auto-negotiate quality based on your uplink network’s capabilities, however we give you the option to override the maximum quality level. This is useful if some of your viewers have limited connection.
We also give you the option to select a different codec. Currently VP8 is the highest quality with the most compatibility. We included H.264 as a legacy option. We also included VP9, which is a higher quality codec than VP8, but with no current support in iOS or Safari.
When you’re ready, press “Start Streaming”. If you’ve already activated a pass for the day, your stream will begin immediately. You can confirm that the stream is active by monitoring the feed in the viewer above the chat. That’s it! You’re now sending an ultra-low latency stream to your viewers. Because the browser auto-negotiates bitrate it may take a minute for the stream to settle in to the highest quality.
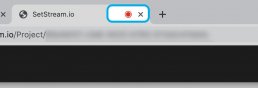
You can now collapse the “Web Broadcast” tab and the streaming will continue. You’ll also see an icon in your browser tab confirming the input is active.
If you need to change sources, first stop streaming. Then change the source and start streaming again.
If your input source comes unplugged from the computer, plug it back in, wait about 10 seconds, then refresh the browser. Your source should be selectable again from the dropdown. You can then resume streaming.